Release news Naviate for Revit
Naviate Fabrication December release news 3.11
Release notes for Naviate Fabrication. Release includes Licensing updates to login/logout, Rehost, Fabrication Parts Palette, Advanced Renumber Sequences, Data Flow and lots more.
-
Update
-
Update
-
Update
-
Update
-
Update
-
Update
-
Update
-
Update
-
Update
-
Update
-
Update
-
Update
-
Update
-
Update
-
Fix
Licensing Updates: Login/Logout
Naviate Login and Logout is now possible in an active Revit session, no longer requiring closing and re-opening Revit to release or activate a license.
After opening the About/Licensing dialog in [N] MEP or [N] Fabrication, Naviate Login and Naviate Logout buttons are now available. These buttons can be used in the Revit session, without the need to restart Revit Login and re-activate the Naviate license.
If you decline Login at Revit startup, or had no connection to the Internet, clicking Naviate Login at the About/Licensing dialog will open the default browser to sign in to your Symetri account. Additionally, there is an option to scan a QR code to direct to the appropriate web link to sign in.
Note: Logging out and Logging back in with a different Symetri account is currently not possible in v3.11. It is only possible at this time to Log back in using same email address (Symetri account) that was used at the time of Logging out.
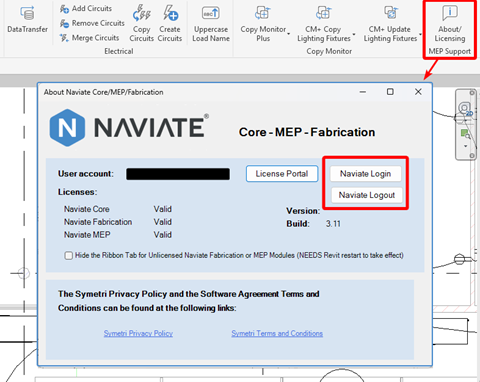
Figure 1
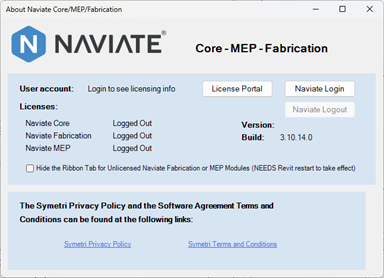
Figure 2
Rehost
The following commands are new Rehost commands and improvements in v3.11:
Quick Rehost
This is a new Rehost command that when executed will rehost Fabrication Hangers/Pipe OLETs/Duct Taps that are aligned in their XYZ to the centerline of associated Fabrication Straights.
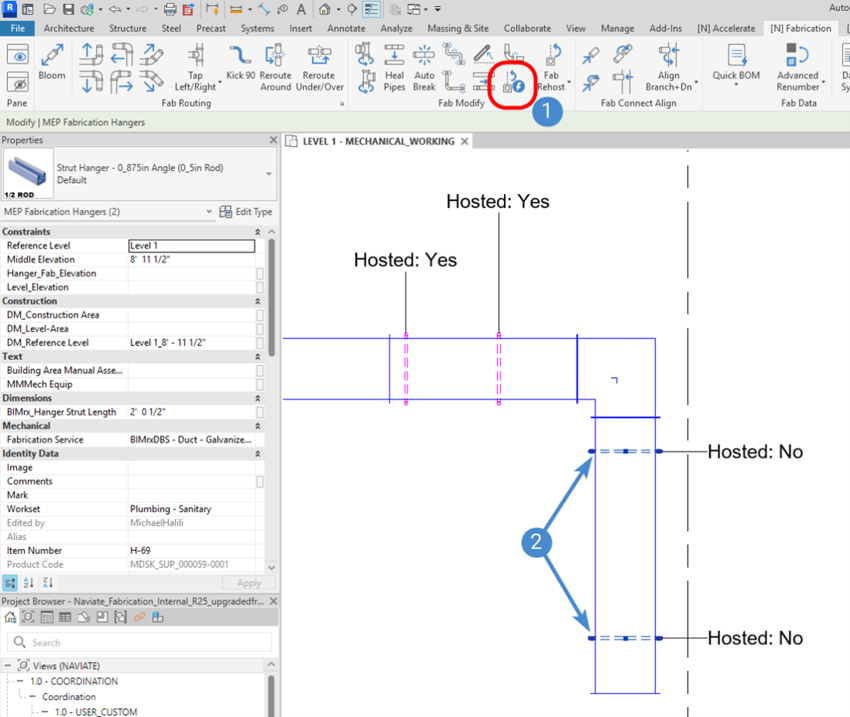
Figure 3
Steps to execute the command with pre-selection (Figure 3):
- [N] Fabrication – click the ‘Quick Rehost’ button
- The pre-selected Fabrication Hangers/OLETs/Taps will be rehosted if they are properly aligned by X-Y location and elevation to a Fabrication Straight.
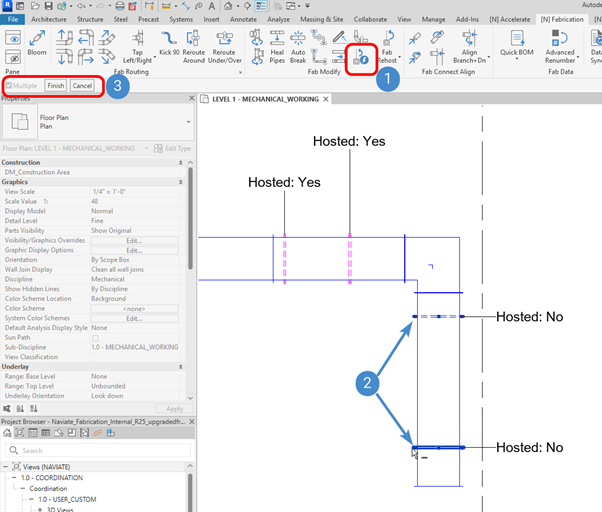
Figure 4
Steps to execute the command without pre-selection (Figure 4):
- [N] Fabrication – click the ‘Quick Rehost’ button.
- Select Fabrication Hangers/OLETs/Taps.
- Click ‘Finish’ (not pictured).
- The pre-selected Fabrication Hangers/OLETs/Taps (as indicated with the ‘2’ marker in Figure 3) will be rehosted if they are properly aligned by X-Y location and elevation to a Fabrication Straight.
Result: when executed, the Fabrication Hangers/OLETs/Taps will be rehosted (or connected) to the Fabrication Straight that is it is aligned to. Please note that both the X-Y location and the elevation of the Hanger/OLET/Tap must be aligned/centered in order the Quick Rehost to execute as intended. See Figure 5. Error! Reference source not found.
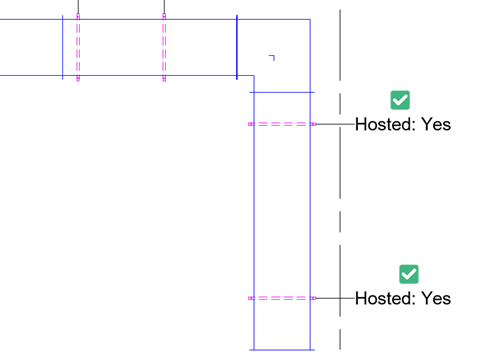
Figure 5
Copy Rehost Plus
This is a new Rehost feature that expands upon the existing Copy Rehost command. The existing Copy Rehost command will allow you to first select host Fabrication Hangers/OLETs/Taps to copy and then choose a Fabrication Straight to paste to, hosting them as needed to that Straight.
Copy Rehost Plus on the other hand, is a true base point to destination point copy-paste process, allowing you to copy Hangers/OLETs/Taps that span multiple non-colinear Straights and paste to destination Straights in a similar configuration. Copy Rehost Plus will also account for any elevation change between the copied elements and the destination elements, by prompting to select an element to inherit its elevation for the pasted elements. As always with Rehost commands, the pasted Hangers/OLETs/Taps will be connected to the destination elements.
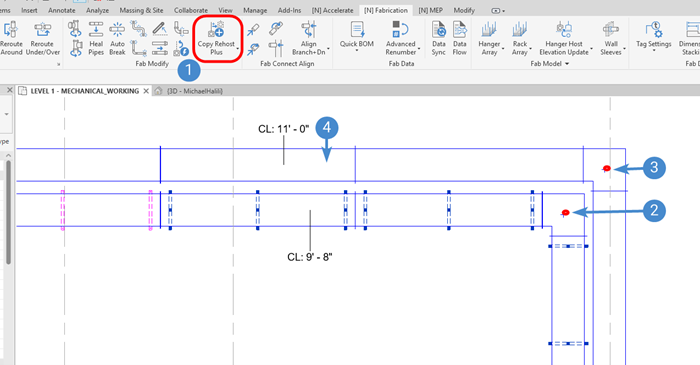
Figure 6
Steps to execute the command with pre-selection (Figure 6):
- [N] Fabrication – click the ‘Copy Rehost Plus’ button.
- Select the base point at which the pre-selected Hangers/OLETs/Taps will be copied.
- Select the destination point at which the new Hangers/OLETs/Taps will be pasted.
- Select the element at which the new Hangers/OLETs/Taps will inherit for their elevation, connecting to Fabrication Straights that are located/aligned to the new Hangers/OLETs/Taps.
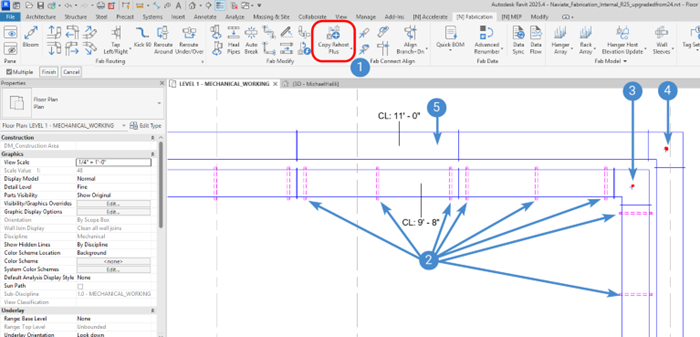
Figure 7
Steps to execute the command without pre-selection (Figure 7, Figure 4):
- [N] Fabrication – click the ‘Copy Rehost Plus’ button.
- Select the Hangers/OLETs/Taps you wish to copy.
- Select the base point at which the selected Hangers/OLETs/Taps will be copied.
- Select the destination point at which the new Hangers/OLETs/Taps will be pasted.
- Select the element at which the new Hangers/OLETs/Taps will inherit for their elevation, connecting to Fabrication Straights that are located/aligned to the new Hangers/OLETs/Taps.
Result: when executed, the Fabrication Hangers/OLETs/Taps will be rehosted (or connected) to the destination Fabrication routing. Note that the newly pasted Hangers/OLETs/Taps will reflect the new elevation after selecting the element at whose elevation is inherited. See Figure 8. Figure 5 Error! Reference source not found.
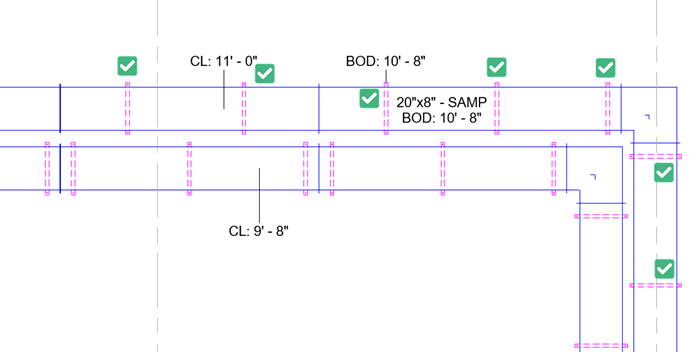
Figure 8
All Rehost Commands
Commands now are compatible with pre-selected elements. Added compatibility for Vertical Hangers, such as Riser Clamps.
Fabrication Parts Palette – Exclusion Import/Export
Added new commands to Export and Import Fabrication Palette Button Exclusions to and from an external JSON file.

Figure 15
As seen in Figure 15, two (2) buttons have been added to the Fab Manage (formerly Fab Support) pane:
- Export Exclusions – Export MEP Fabrication Parts palette Exclusions settings
- Import Exclusions – Import MEP Fabrication Parts palette Exclusions settings
When the Fabrication Parts Exclusions are exported by clicking (1) in Figure 15, Naviate will prompt to a Save As dialog. Here, the Exclusions are saved as a .json file that can be saved externally as a file.
Results: Once saved, the Exclusions can be imported by clicking (2) in Figure 15. Naviate will prompt to an Open dialog, where you can choose the exported Exclusions .json file. Once opened, the results are as follows:
Import Successful – Naviate was able to successfully import Exclusions Settings. In order for the Exclusions to be displayed on the Fabrication Parts Palette, you must first toggle one of the ‘Service’ or ‘Palette’ selections to a different Service or Palette. After toggling and switching back to another Serivce/Palette, the Exclusions will appear as defined by the .json file. See Figure 16.
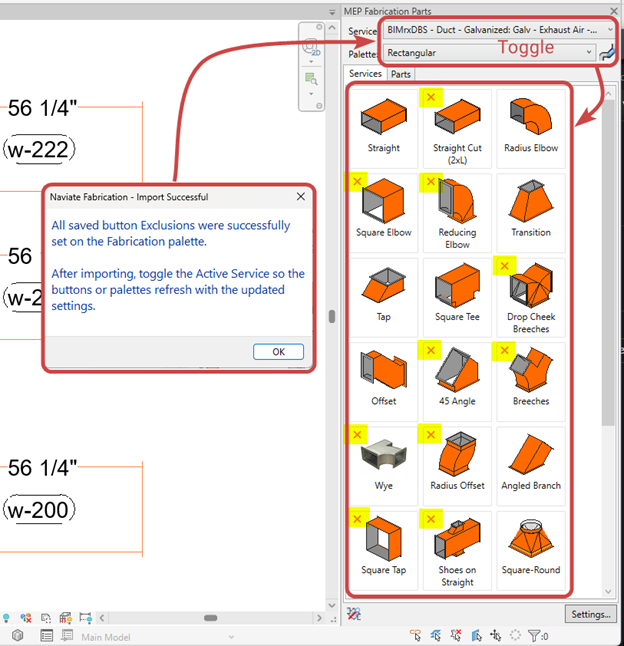
Figure 16
Database Mismatch – If the model-to-import and the exported-model contain different Fabrication Databases or have any discrepancies, the following notification will appear. See Figure 17.

Figure 17
Advanced Renumber - Sequences
Within the existing Advanced Renumber command, v3.11 has an added functionality to save a Sequence of Advanced Renumber Settings. Next to the existing Settings tab, the Sequences tab will allow you to create, edit, and manage Advanced Renumber Sequences.
In the Advanced Renumber command, Sequences are defined as an ordered collection of Settings, executing multiple Advanced Renumber Settings in one transaction. The Sequences dialog can be accessed by clicking the Sequences tab, located next to the Settings tab in Advanced Renumber. See Figure 13.

Figure 13
The steps to create an Advanced Renumber Sequence are as follows (see Figure 13):
- [N] Fabrication – click the ‘Advanced Renubmer’ button.
- Click the ‘Sequences’ tab.
- Use these buttons to duplicate an existing Sequence, create a new Sequence, Export Advanced Renumber Settings/Sequences, and Import Advanced Renumber Settings/Sequences. Note that these buttons, along with saving, renaming, and deleting of Sequences, are similar in functionality to Advanced Renumber Settings.
- Click the ‘+’ button to open the Settings columns dialog, allowing you to choose from the Available Settings in the project to move over to the right-hand column, displaying Settings that will be assigned to the Sequence.
- Once an Available Setting is selected, click the ‘>’ button to assign this Setting to the Sequence. The ‘<’ button will unassign the Setting from the Sequence. At the time of v3.11m the Setting will remain in the Available Settings column even if has been ‘moved’ to the right-hand column.
- Use the ‘up’ and ‘down’ arrows to reorder the Settings in the Sequence. The Sequence will order executions from the top to bottom in the Sequence Settings list.
- Chaining Settings – when checked ON, this Setting will continue the numbering from the previous Setting. When unchecked, the associated Setting will start back at the Advanced Renumber Setting’s Starting Number value.
- When ready to save and accept the Sequence’s options, click ‘Accept’ to return to the Sequences dialog.
Advanced Renumber Sequences in Spool Manager
The Sequences that are created and managed within Advanced Renumber are also accessible inside of Naviate Fabrication’s Spool Manager. See Figure 14 for examples of how to access Sequences.
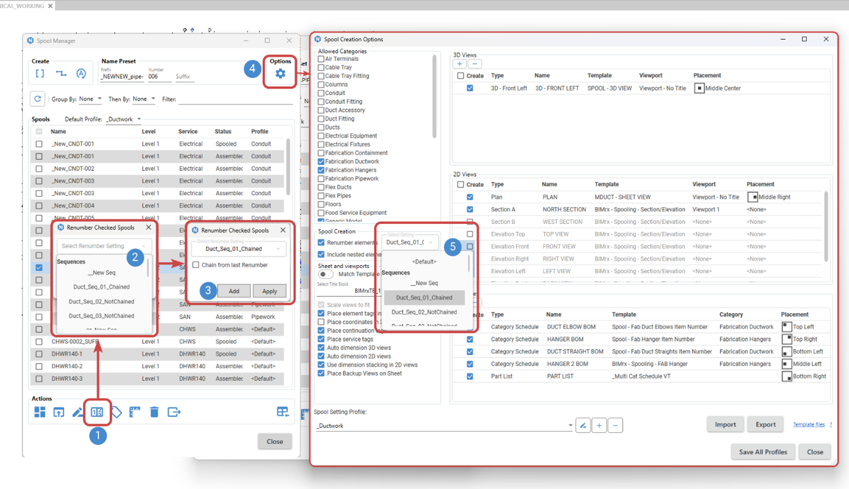
Figure 14
Steps to access Advanced Renumber Sequences inside Spool Manager:
- In the main Spool Manager UI, click the ‘Renumber Checked’ button in the Action Palette.
- In the Renumber Checked Spools dialog, Sequences that are saved in Advanced Renumber will appear in the drop down. Select the Sequence to use as the Renumbering setting for the checked Spool.
- Once the Sequence (or Setting) is selected, you can click ‘Add’ to add to an ‘on-the-fly’ Sequence. Otherwise, click ‘Apply’ to execute the Advanced Renumber Setting/Sequence for the checked Spool.
- Additionally, when clicking this button to open Spool Manager Options, you can preset an Advanced Renumber Sequence when creating Spools with Spool Manager.
- In the Spool Creation palette, choose the Advanced Renumber Sequence/Setting to apply to the Spool Manager Option Profile. This Sequence/Setting will apply its renumbering rules to the elements contained in the created Spool.
Data Flow
Powershell Script Generation
Within the Data Flow Scripts tab, leverage AI to assist with Powershell scripting, gathering more information on the Revit API or write the Powershell Scripts based on a user input.
With the v3.11 .msi installer, there is a new feature “Naviate AI” listed in the Custom Setup step of installation. See Figure 9. This is a new option to enable or disable all AI features in Naviate:
- If checked ON or enabled
- The Generate with AI button will appear in the [N] Fabrication > Data Flow > Scripts dialog.
- Naviate AI Assistant will appear in the [N] Accelerate
- If unchecked or disabled
- The Generate with AI button will NOT appear in the [N] Fabrication > Data Flow > Scripts dialog.
- Naviate AI Assistant will NOT appear in the [N] Accelerate
Note: AI cannot be turned on by any Naviate products AFTER install. For example, [N] Accelerate cannot turn on [N] Fabrication’s AI if a user already has [N] Fabrication installed. However, in the v3.11 installer, when ‘Naviate AI’ is changed from ON to OFF, all AI Features will be turned OFF for Naviate products that are already installed.

Figure 9
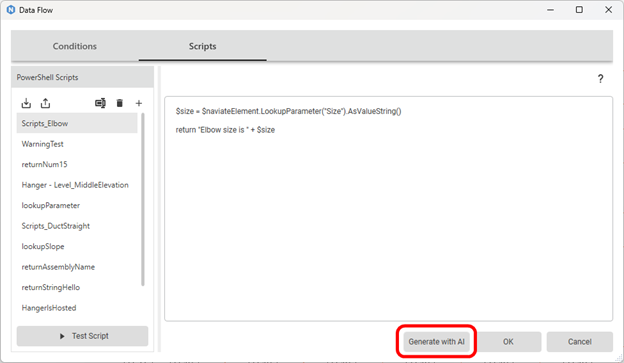
Figure 10
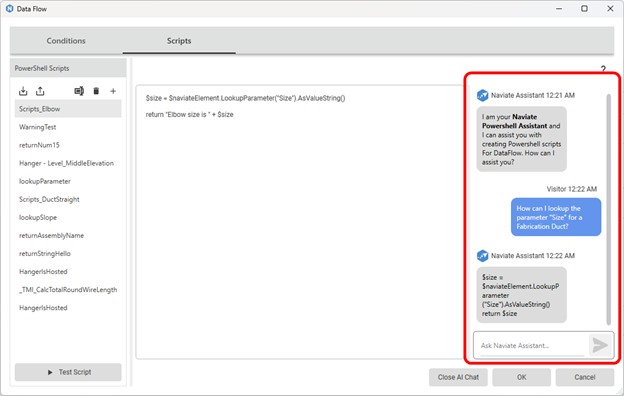
Figure 11
Other Improvements
- Condition will skip Elements where its Target Parameter is locked due to an RFA formula-driven parameter. Error Reporting will display if a Condition's Target Parameter is missing or unable to be modified.
- Data Flow’s Updater UI will notify if another Auto-Condition is retriggered, due to elements being added to the model or modified.
- Using Figure 12 as an example, modifying elements caused six (6) additional Conditions to be executed, with “Duct Straight Test 2” being the Condition currently being processed.
- The Updater UI will also indicate a progress of the elements to updated as well as notifications that the Updater will retrigger if those elements are included in any remaining Auto-Conditions.
- There are two (2) options in the Updater UI to interrupt the Updater:
- Skip Condition – will stop and revert any modifications done by the Condition currently being processed, then proceed to the next Condition.
- Cancel Updater – will stop and cancel any remaining Conditions that are upcoming. All modifications will be reverted back to before the original element modification.
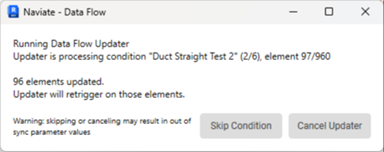
Figure 12
Spool Manager
Various improvements to Spool Manager have been implemented including:
- Schedule View Templates being applied to the Spool Schedules as set in Options
- Rename Spool/Dimension Checked/Tag 3D Views/Place 3D-2D Spool Views improvements
- Spool Manager opens as its own window.
BOM Options – Import/Export
When BOM Options are exported from one project and imported into another project, the associated Naviate Filter Elements Settings are also included.
Hanger Array Configurations – Import Improvements
Improved the Import workflow to avoid duplicate 'Not Found' warning popup messages and associating the correct Service based on a matching Service Name. Renamed commands from ‘Trapeze’ to ‘Rack’.
Rotate Fitting 180
Added compatibility with preselection of elements.
Manual Sleeves
Using the [N] Fabrication > Manual Sleeves command, the following updates have been implemented for certain Revit Category elements:
- Cable Tray = “DuctAccessories” Category with Type Name “BIMrx_ ElectricalAccessory_Sleeve_Rectangular_Single”
- Conduit = “DuctAccessories” Category with Type Name “BIMrx_ ElectricalAccessory_Sleeve_Round_Single”
- Oval Duct = “DuctAccessories” Category with Type Name “BIMrx_ DuctAccessory_Sleeve_Rectangular_Single”
Data Sync
Added compatibility with Filled Regions.
Bloom
Added compatibility with preselection of single or multiple elements.
Accessory Align
Added compatibility with Pipe OLET parts.
Tag Setting Schema fixes
With the updates to Core.MEP.Fabrication v3.10.0.2 and v3.11, Naviate has built-in process that occur in order to mitigate the Tag Settings Schema conflicts as much as possible. Please refer to the following information that summarizes causes for the conflict errors and how to resolve using Naviate.
Read the full support document here.
Fixes
- Points Location
- Resolved an issue where the BIMrx_Point Location X, Y, Z parameters did not reflect units based on the Project Units.
- Blockout Sleeve
- Resolved an issue when placing a Blockout Sleeve at a Linked Wall or sloped Roof.
- Reroute Around & Over/Under
- Resolved an issue when Pipes are routed in a non-orthogonal direction with respect to the Project.
- Rotate Fitting
- Resolved an issue with unconnected fittings.
- BIMrx_Rod Size
- Resolved an issue with this parameter reporting incorrectly.
- ADV Renumber
- Resolved an issue when the 'Run Checked' button was clicked would apply the same number for all Elements.
- Resolved an issue where the Element's GUID was being used as a number.
- Reroute Over/Under
- Resolved an issue where Rectangular/Oval Fabrication Ducts swapped the Width and Depth size parameters.
- Total Station Export to CSV
- Resolved an issue where incorrect units were being applied (with respect to Project Units) to the CSV Export.
- Trapeze Update and Hanger Host Elevation
- Resolved issues with commands not compatible with sloped elements.
- Hanger Commands
- Instead of multiple, stacking warning messages reporting Hangers that could not be placed, now displays one message reporting the quantity of Hangers experiencing an error.
- Resolved Import issue when just Service Name matches.
- Data Flow
- Conditions that are enabled ON and set to Auto will now Execute without having to open and close the Data Flow UI.
- Naviate_SelectionBOM_Id
- Parameter is now set to "Values can vary by group instance" - allowing BOM Tools to work with Groups.
- Data Sync
- Resolved an issue with command not working with Filled Regions and duplicating relationships.
- Spool Manager
- Resolved an issue with 'Tag Selected 3D Views' button not executing after the Spool Manager window is reopened.
- Fabrication Palette
- Resolved an error when modifying a connector on a tap that does not have an open end.
- TagSettings Schema
- 3.11 includes an auto-update of the appropriate TagSettings Schema, avoiding the Conflict Error message on document open if a conflict is detected.